Local Hardware I/O
Use up to eight available GPIOs for switches or DS18B20 temperature inputs. These work locally, including when Home Assistant or MQTT is offline.
Open I/O in the Web Admin. Assignments belong to the physical panel and are excluded from dashboard exports.
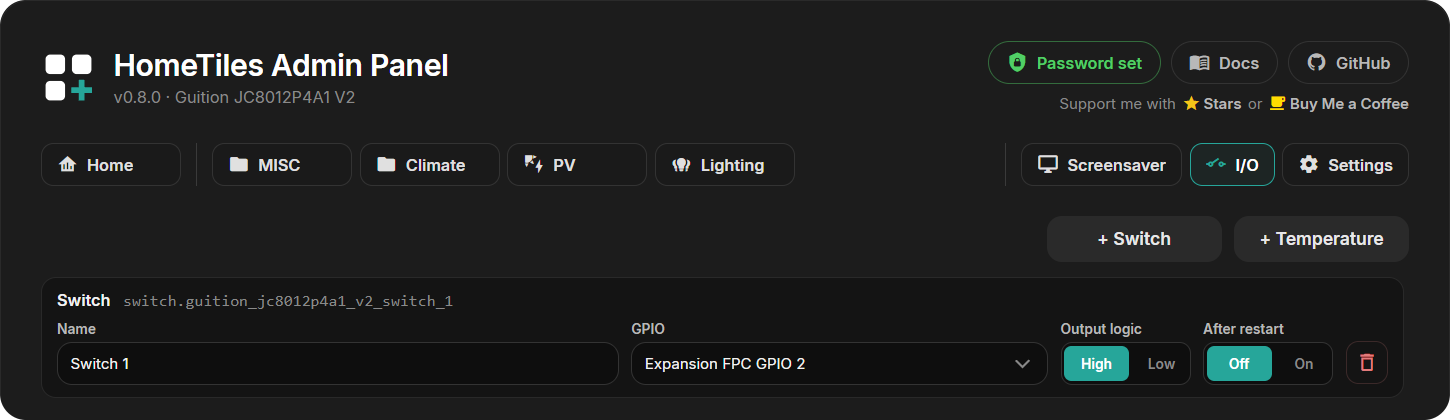
Switch Outputs
- Select + Switch and enter a name.
- Choose an offered GPIO.
- Set the active High / Low level where configurable.
- Choose the startup state, Off / On.
- Select Save to apply the assignment. Restart reboots separately and does not save edits.
For the 86-Panel-ETH-2RO, select Relay 1 or Relay 2 explicitly; the shared Waveshare 4B firmware also serves boards without these relays. On closes NO-COM, Off closes COM-NC, and their active-high polarity is fixed.
Relay-equipped Guition ESP32-4848S040 variants expose their first onboard relay.
DS18B20 Temperature Inputs
Select + Temperature, enter a name, choose a GPIO and precision, then save.
Use one DS18B20 per GPIO, external sensor power, and a 4.7 kΩ pull-up from data to 3.3 V. The internal pull-up is disabled. Values are available to local Sensor tiles on the dashboard and screensaver.
Tiles And Home Assistant
After saving, select the local entity in a Switch or Sensor tile on the same panel.
Bridge v0.6.32 or newer also adds it to the panel's Home Assistant device. Outputs become switch entities; temperatures become sensor entities. Existing names changed manually in Home Assistant are preserved.
Available Pins
The I/O selector offers only pins assigned for use by that device's firmware profile. Check connected expansion modules for conflicts; some listed profiles still need physical I/O validation.
Pin list by device
| Firmware target | Offered local I/O | Validation |
|---|---|---|
| M5Stack Tab5 | GPIO EXT 0, 1, 49, 50; Port A 53, 54; M5-Bus 2, 3, 4, 16, 17, 45, 47, 48, 51, 52 | Profile-whitelisted; attached Units and M5-Bus modules can still create conflicts |
| Waveshare 4B | P3 GPIO 2, 3, 4, 5, 21; 86 Panel relays GPIO 32 and 46 | P3 schematic-derived; onboard relays only for the exact 86-Panel-ETH-2RO |
| Waveshare Touch LCD 4.3 inch | None | The exact board profile reserves its documented display, touch, microSD, USB and ESP-Hosted connections |
| Waveshare 7 inch | GPIO 2, 3, 4, 5, 21, 22, 28, 29, 30, 31, 32, 34, 46, 47, 48, 49, 50, 51, 52 | Physical hardware validation needed |
| Waveshare 8 inch | GPIO 2, 3, 4, 5, 21, 22, 28, 29, 30, 31, 32, 34, 46, 47, 48, 49, 50, 51, 52 | Profile-whitelisted; verify attached hardware |
| Waveshare 10.1 inch | GPIO 2, 3, 4, 5, 21, 22, 28, 29, 30, 31, 32, 34, 46, 47, 48, 49, 50, 51, 52 | Physical hardware validation needed |
| Guition JC8012P4A1 | Expansion FPC GPIO 2, 3, 4, 5, 28, 29, 30, 31, 32, 33, 34, 45, 46, 47, 48 | Schematic-derived; verify the connected expansion board |
| Guition JC8012P4A1 V2 | Expansion FPC GPIO 2, 3, 4, 5, 28, 29, 30, 31, 32, 33, 34, 45, 46, 47, 48 | Separate V2 profile; same reported board wiring, community validation ongoing |
| Guition JC1060P470C V1 / V2 | Expand GPIO 1, 2, 3, 4, 5, 20, 32, 33, 46, 47 | GPIO45 is reserved for the active-low SD-card power switch; physical validation needed |
| Guition JC4880P443 | None | The exact board profile reserves its documented display, touch, microSD, USB and ESP-Hosted connections; contributor-tested |
| Guition ESP32-4848S040 | Onboard Relay 1 on GPIO 40 for relay-equipped variants | Supported; relay-equipped variants only |
| Waveshare 7B / 7B-C | None | No configurable GPIOs in these profiles |
| Waveshare S3 LCD-4 Rev 4.0 / S3 LCD-4B | None | No configurable GPIOs in these profiles |
3.3 V logic only
Never connect a relay coil, mains voltage, or another high-current load directly to an ESP32 GPIO. Use a 3.3 V-compatible driver or relay module and follow the manufacturer's schematic. Do not assign a pin already used by an attached module.